Scratch Tutorial |
您所在的位置:网站首页 › scratch scratch scratch › Scratch Tutorial |
Scratch Tutorial
|
SCRATCH TUTORIAL
INTRODUCTION TO SCRATCH: Any digital world is empty without animations and games, which is why experts keep producing stories, games, and animations regularly. Scratch is a tool developed by MIT Media Lab and is available for the users for free. Scratch can be used to bring life to many scripts and stories through animations and visual effects. These are the primary means of communicating with online viewers and are a great way to engage different types of audiences. It also uses a block-life interface and is available in over 80+ languages. Scratch Programming Tutorial is taught to students in schools, universities, and even outside these educational institutions, which has increased the number of users and visitors every month. The old version of Scratch, “Scratch mit edu 2.0,” was launched on May 9, 2013, while in 2016, the new version got released. Since then, till January 2018, many public alpha versions of Scratch have been released. On January 2, 2019, Scratch 3.0 took its full form. Here’s a basic tutorial on how to do scratch coding Programme, how to make a game on scratch, why you should use it and how does scratch work鈥檚. WHAT IS SCRATCH PROGRAMMING?Scratch Programming deals with creating a script with the help of blocks. The developed stories, script, animations, and games can be shared online on the Scratch website for the mass audience. This programming language code is called the ‘Educational programming language.’ BASIC COMPONENTS USED IN SCRATCH PROGRAMMING:
Image source: cutt.ly Stage: Use Stage for viewing and reviewing the output of your programming. Sprites: Treat Sprites as an object / as a basic unit used for developing a program. Scripts: Scripts are of different features and properties as they are used to fixing the sprite’s values and for implementing and controlling the function of Scratch programming. However, the first and default Script involves ten types of script blocks. Area and Blocks: A collection of multiple blocks becomes a program that will work as a single unit. OTHER IMPORTANT SCRATCH CONCEPTS: PROJECTS:Projects are nothing but the work you do in Scratch. Scratch Projects can be a game / a story / a small animation / or even a short art work. Whatever coding is performed in Scratch, it is called a Project, which can be published online for a worldwide viewership. 2. ONLINE & OFFLINE EDITOR: Scratch can be used for editing purposes as well. One can use that service either online or offline. Click ‘Create Tab’ on the website to open ‘Scratch Online Editor,’ but you should download the “Offline Scratch Editor” in your device to open it. 3. INTERFACE: Scratch Interface consists of 3 sections. The first section deals with space and program that deals with getting a project framed or developed while the other part deals with running the generated project in suitable environments. The third section is called the ‘block palette.’ Scratch is also a flexible tool that is also user-friendly. This feature makes it apt for programming as one can create projects according to their desires and interests. 4. BLOCKS: Blocks are known as the units in Scratch programming Online that carry a set of specific predefined commands. Each block has its own set of functions and properties and are unique from each other. On some occasions, few blocks can be placed inside another set of blocks too. 5. EDITORS FOR PAINT AND SOUND: You can create and edit different sprites or objects using the Scratch Paint editor. To add new sounds to the visuals or to modify the already existing sounds, the Scratch Sound editor can be used. You can access these two tools by pressing the tab present above ‘Blocks Palette.’ 6. BACKDROPS: A project’s backdrop is static and can be used for displaying broadcasts and for playing background music. You can use the Scratch Paint editor to change or edit the backdrop’s image. 7. REMIXING: Just like remixing an old song for a change in the rhythm, an old project can be remixed in Scratch by a user. 8. SHARING A PROJECT: You can share a project from the online Scratch editor, or you can use the ‘Share’ button present in the ‘unshared project’s page.’ To share a project from the offline mode, you need to upload it to the online Scratch editor and then share it. These are the various Scratch concepts that you need to know. BASIC SCRATCH PROGRAMMING EXAMPLE:
Image source: cutt.ly How to make a game on scratch step by stepFollow these steps to create sprites in Scratch Programming: First, open a new and clean project space in Scratch. Open the ‘Code’ section from the Scratch program and select ‘MOTION.’ Now choose the block that reads, ‘move () steps.’ Drag that block to the right, where the ‘Scripts Area,’ which is dark grey, is present. The default, ‘Scratch Cat’, will be created, which shows that you have placed the block correctly. Now when you press on the block and not on the while area, you can see the Scratch cat moving ten steps.Listed above is only one way of creating an object. You can test and see what other option from the block categories are too. FEATURES OF SCRATCH PROGRAMMING:The latest version of Scratch is Scratch 3.0 and here are some of its basic and existing features: SCRATCH AND TABLES:The new Scratch version works on HTML 5 and, therefore, can support working on tables and in any modern browser/device, unlike Flash, which requires you to access it every time you want to work. 2. SCROLL BAR: These scroll bars allow you to organize and view different codes, even on a small screen. These are very efficient when there’s a crowd of unorganized codes. These scroll bars will also help you clean up some space. 3. EXTENSIONS: Scratch 3.0 has many new extensions that allow you to access ‘text-to-speech’ and translation features. You can also find these extensions in devices like ‘Makey Makey’ and ‘micro:bit.’ Even the blocks used for Music and Pen (object) are now part of the extensions, which has made it easier for the users to try them. 4. BLOCKS ARE NOW BIGGER: This feature helps a user using a tablet or a smartphone for drafting a project in Scratch by increasing the size of the blocks. This feature is also beneficial for those who use desktops to work. 5. SPRITE IN SCRATCH 3.0: Unlike Scratch 2.0, you can now easily access, modify, and refer sprites quickly as they are present right below the stage. It is also an easy task to create scratch games for the users to even change the costume of the sprites in Scratch 3.0 as they get to see the image of various costumes available instead of just numbers. 6. SOUND EDITING: To edit sounds in Scratch 3.0 is never a tedious work as you can speed up / slow down / reverse / attach an echo / even improvise the vocals like that of a Robot with simple tools. ‘Space, Wacky, and Sports’ are the new categories added to the sound library. 7. SPRITE EDITING: Similar to that of the sound editing techniques present in Scratch 3.0, you can create, improvise, and edit different sprites in Scratch’s new vector graphics editor. 8. DELETION: You no longer have to change the position of the coding to delete something in the middle; instead, you can just right-click on a block and choose the ‘DELETE’ option. 9. CACHED VARIABLES: Cached variables store codings then and there, to reduce the time required to save huge coding files and the time needed to load all of them. These are the nine important Scratch features. NEED FOR SCRATCH PROGRAMMINGScratch is a powerful programming language and is also a flexible one that can be used for generating simple scratch game ideas and different animations without much strain. Benefits of Scratch Programming: Through Scratch Programming, one learns the basics of code computer programs and other scratch designs and ideas. Use Scratch to make different games, stories, animations, and other interactive images and videos. The developed projects can also be shared online, which will give you and your work broad recognition. This programming language is mainly for children (ages 8-16). Therefore, a kid’s creativity, imagination, collaborative work, and reasoning skills are enhanced. Scratch is a flexible programming language that supports all kinds of users and different project creations. This Scratch computer programming language can be used for various settings and are used in community centers, schools, libraries, museums, and even homes. Scratch is not only useful for children but is also of great help and use for parents, researchers, teachers, and students. It has a global reach, which brings in more exposure to the users too. Most importantly, the Scratch Programming language is for free and is therefore used by many students for many academic purposes. SCRATCH GAME TUTORIALIt is time to understand how to use Scratch Programming to deal with scripts, sprites, and to create a game. 
Image source: cutt.ly WORKING WITH SCRATCH SCRIPTS: Create a new script by just clicking on it. Drag the required blocks from the ‘Block Palette.’ Except ‘Hat Blocks,’ other blocks can be assembled below/in another block. You can just drag the unwanted blocks apart to disassemble the blocks. To edit a script, click the sprite’s ‘script tab’ and also the Stage. If you want to delete a script, you can just right-click on the ‘Hat block’ and click DELETE, or you can drag the unwanted scripts back to the block palettes.SPRITES in SCRATCH: These are the different ways to get new sprites in Scratch. Choose a sprite from the ‘Sprite library.’ Open the ‘Paint Editor’ to draw a new sprite. You can also get a new sprite as a surprise. Finally, you can also upload an image from your device in Scratch.Follow the following steps to make your sprite interact: Make one sprite touch another, to evoke an event, and to make them communicate with each other. You can capture this communication with the help of two blocks used to send a message and another for receiving it. You can save the sent message in any name you want. But make sure that the message sent and received are of the same name and are identical. BUILDING A GAME WITH SCRATCH
Image source: cutt.ly How to make a car racing game on scratchTo create a game in Scratch is one of the exciting things to do. However, here is a small scratch mit edu tutorial on how you can create a Car Racing game in Scratch. SET YOUR TRACK: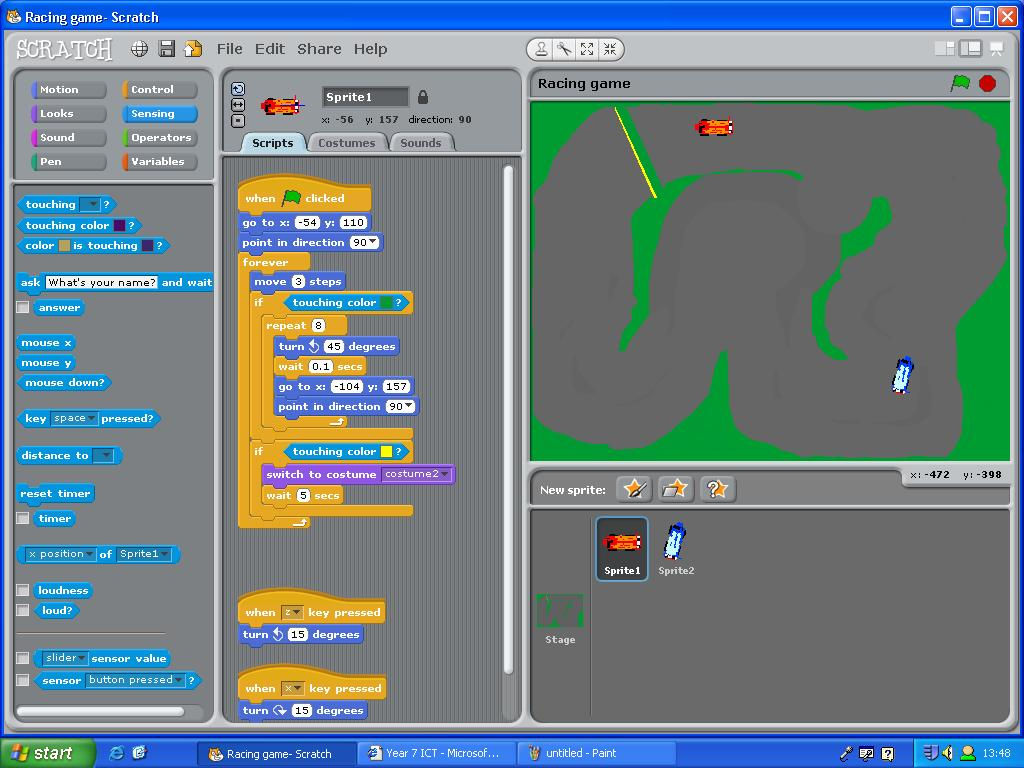
Image source: cutt.ly First, open Scratch online by going to https://scratch.mit.edu. Select CREATE to open a free area and the Scratch interface to work. If you want to make your work easier, get the ‘All Tips’ sidebar closed and press ‘X’ from the tips. Now name your game by clicking on the page’s upper-left corner and by typing the name of your game. We do not need the default Scratch cat for this game. Therefore, you can delete it by right-clicking the cat from the ‘Sprites’ page and then by pressing DELETE. If you are using a Mac, then keep pressing the CTRL button while opening the drop-down menu of the sprite. You will have to choose the backdrop now, so choose the BACKDROPS tab from the Scratch page. You should first fill the background. Now press the icon that has the ‘paint bucket’ and then choose your required background color. Bring the cursor to the background that’s present on the page’s right side and click it. It is now time to lay the tracks for the race. Press the ‘brush icon’ from the tools option and pick a color for the track. If you want to increase the size of the brush, you can do that by bringing the slider to the right. The tracks should be drawn in a cyclical shape and should avoid doing it in the circular shape. It is vital to add the start and finish line. To do this, select a different color, reduce the width of the brush, and draw a plain straight line in the place where you want to start and finish the race.2. CREATE A RACER: From the ‘Sprites’ pane, choose the ‘Paint new sprite’ (brush-shaped line) symbol. Zoom in the image by pressing the ZOOM IN option that has a magnifying glass as its symbol and press ‘+’ for at least four times to see the picture. If in case you forget to do it at the start, then close the ‘Tips’ sidebar to work freely. Now get the brush and draw a racer the way you like it. First, use the ‘rectangle tool’ for drawing the car and then use the ‘circle tool’ to draw its wheels. You can then know the center of your racer by noting the position of the ‘+’ icon on the pane. If you want to have your racer as a crashed racer, go to ‘Paint new costume’ and select ‘NEW COSTUME.’ Now you can draw a costume that fits for a crashed racer, which will also change the facial expression of the racer. The racer will use this costume whenever he/she goes through any other obstacles during the race. From a collection of racers you drew, choose the first image from the pane’s left side. Now place the racer before the finish line (starting point) to make sure that the racer starts the game from the right position. You will have to do this before you start with your script. Go to the left-hand pane and do these.3. CREATE A STARTING POINT: Select SCRIPTS TAB Choose EVENTS to open the various event-based code brackets available. ‘When flag clicked’ symbol should be clicked and dragged to the pane from the right-hand pane. From the Scripts column, choose MOTION. To fix the starting point, first review the x and y coordinates of your racer by placing your cursor on him/her. The coordinates will be available above the ‘Sprite’ window. Click and drag the event that says ‘go to x: 16 y: 120’ to a palace where it gets settled and fits with the ‘when flag clicked’ event. To change values, double-click the value of the X coordinate and type the new value. Change the value of Y by pressing the TAB key. Now click ENTER. From the ‘Motion’ menu, drag the ‘point in direction 90’ and place it under the ‘go to x y’ box. Now your car is in the right direction to start the race. However, to bring the regular racing costume to the racer after you reset the game, you should change his crashed outfit, so choose LOOKS and drag the ‘switch costume to costume2’ option below the starting point. Now open the ‘costume2’ box and choose COSTUME1.4. CREATE MOVEMENTS: To prepare a script that makes your racer move forwards: Click EVENTS, bring the ‘when the flag clicked’ event to the pane and press CONTROL. Below the ‘when the flag clicked’ script, place the ‘forever’ event. Press MOTION and choose the ‘move ten steps’ option and drag it to the ‘forever’ slot. Now change the variable “10” from ‘move ten steps’ event to “2” and click ENTER. To create tuning controls: Choose EVENTS and get the ‘when space key is pressed’ event dragged to the pane twice, leading to 2 separate events. From one ‘when space key is pressed’ event, choose the SPACE text box and press the ‘left arrow.’ From another ‘when space key is pressed’ event, choose the SPACE text box and press the ‘right arrow.’ Do both from the drop-down menuTo use the arrow keys for turning your racer: Press MOTION and bring the “turn [right arrow] 15 degrees” event to the “right arrow” control. Bring the “turn [left arrow] 15 degrees” event to the “left arrow” control.If you want to declare ‘Crash’ when your racer touches the background color: Bring the ‘if then’ function to the blank space by pressing the CONTROL button. Now select SENSING and bring the ‘touching color’ option and place it between the ‘if’ and ‘then’ terms. Whichever color is present next to the ‘touching color,’ press it and click the background color. Now bring the ‘switch costume to’ from LOOKS and place it in the ‘if then’ gap. After the necessary inputs, bring the full ‘if then’ event and place it in the ‘forever’ gap, which is present below the ‘move two steps’ function/rule. Drag the “stop all” event by pressing Control and place it below the “switch costume to” event. Finally, press “all,” and from the drop-down menu, choose this script.To add a reaction when the racer reaches the finish line as a winner: Place the “if then” option on the blank space by clicking CONTROL and dragging the “if then” option. Now select SENSING and bring the ‘touching color’ option and place it between the ‘if’ and ‘then’ terms. Make a click on the color present next to ‘touching color’ and the click ‘once the finish line.’ Now press LOOKS and then bring the “say hello for 2 secs” function to the “if then” gap. You can now change the variables’ 2′ to whatever amount of time you want, and also, you need to change “hello” to “You won!!” After this, press ENTER. Now, inside the “forever” bracket, placed below another “if” bracket, place the entire “if then” assembly. The final step is to see if your game is working, and for that, you should do the following: Zoom out to see the entire script. You can do this by pressing the “-” button. Now click the green flag and start the game. Use the arrow keys to see if you can drive the car and finish it without much difficulty or crashing. If in case you feel the track to be too narrow or difficult, you can change it by choosing the BACKDROPS tab which will allow you to draw the changes in the areas you want to.CONGRATULATIONS! You have successfully created a racing game in Scratch. If you need to know how to create games on scratch, leave it in the comment box below. CONCLUSION:Scratch Computer Programming Language is an exciting and fun-filled language that interests children to use computer coding and other scratch elements. You can create Scratch games, animations, scripts, stories, and other visuals and Scratch videos according to your interests. To learn and use Scratch is not a difficult task, as the steps involved are quite simple and are understandable. Therefore, get to know Scratch Programming language and create new exciting games and animations to share it with the world through the Scratch website. |
【本文地址】
今日新闻 |
推荐新闻 |